


What Is Flash in Injection Molding?
Flash occurs when molten plastic escapes from the mold cavity and flows into small gaps where it should not enter. Simply put, flash means that an area of the mold that should be sealed is not fully closed, allowing the melt to be squeezed out under pressure. It usually appears as a thin layer of excess plastic around the part edge, parting line, inserts, ejector pins, slide shut-off areas, or vents.
Common Causes of Injection Molding Flash and How to Fix Them
1. Insufficient Clamping Force or Unstable Mold Closing
Insufficient clamping force is one of the most common causes of injection molding flash. During injection molding, molten plastic creates cavity pressure after it enters the mold. If this pressure exceeds the clamping capacity that the machine and mold can stably withstand, the mold parting line may open slightly, allowing plastic to escape and form flash.
This type of flash often appears around the part edge or parting line. In some cases, it is not limited to one local spot. Instead, flash may appear along several edges of the part.

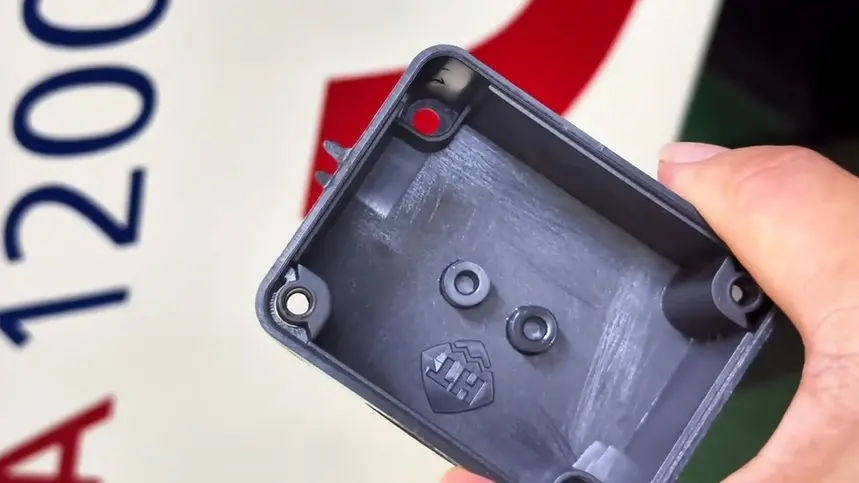
For example, in the black sample shown above, obvious flash appears in multiple edge areas. This looks more like flash caused by insufficient clamping force or unstable mold closing, rather than damage to one local shut-off area. If only one local area were worn, the flash would usually be concentrated in a fixed position. When multiple edges show flash at the same time, it is more important to check whether the cavity pressure has exceeded the available clamping condition.
Possible solutions include:
- Check whether the machine clamping force is sufficient.
- Calculate the projected part area and cavity pressure.
- Check whether the mold closes completely.
- Properly reduce injection pressure or holding pressure.
- Check the machine platen, tie bars, and mold mounting stability.
It is important not to rely only on a large pressure reduction to eliminate flash. If the pressure is reduced too much, the part may develop short shots, sink marks, insufficient dimensions, or weaker weld lines. A better approach is to confirm whether the machine tonnage, mold closing condition, and process pressure are properly matched for stable injection molding production.
2. Excessive Injection Pressure, Holding Pressure, or Injection Speed
Overly aggressive process settings are also a common cause of flash. Excessive injection pressure, high holding pressure, or fast injection speed can push the melt into very small gaps around mold shut-off areas.
This often happens during mold trials. To fully fill the part, improve sink marks, or maintain dimensions, engineers may keep increasing pressure and holding pressure. But if the mold has limited sealing ability, or if there are weak areas around vents, parting lines, or inserts, higher pressure can quickly create flash.
Possible solutions include:
- Properly reduce injection pressure.
- Properly reduce holding pressure or shorten holding time.
- Adjust injection speed to avoid excessive local impact.
- Optimize the transfer point from injection to holding pressure.
- Check for overfilling or excessive packing.
Process adjustment has limits. If flash is reduced but the part starts to show short shots, sink marks, or unstable dimensions, the problem has only been suppressed by sacrificing part quality. That is not a real solution.
3. Mold Wear or Poor Shut-Off Fit
Mold wear is a very common cause of flash in mass production. After long-term production, the parting surface, shut-off areas, insert edges, slides, lifters, or ejector pin holes may wear. Once local gaps become larger, flash may appear even if the process settings have not changed significantly.
This type of flash usually has one clear characteristic: it appears in a fixed location. It may not appear around the entire part, but it keeps showing up in the same local area every cycle.
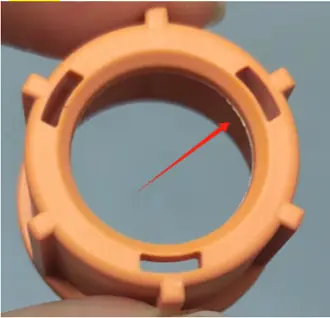

For example, in the orange ring-shaped sample shown above, flash is mainly concentrated in one local area on the inner side instead of appearing evenly around the whole part. This points more toward mold wear or local shut-off failure. In other words, the real issue may not be excessive pressure. The problem is that this specific area has developed a gap after long-term production, allowing molten plastic to escape through the weak point under pressure.
Possible solutions include:
- Check whether the parting surface has dents, wear, or foreign material.
- Check whether the shut-off surfaces fit properly.
- Inspect inserts, slides, lifters, and other moving components for wear.
- Repair the local shut-off area or readjust the fitting clearance.
- Replace worn inserts, slides, lifters, or ejector pins when needed.
If flash is caused by mold wear, continuing to reduce pressure is usually only a temporary fix. The stable solution is to repair the mold shut-off area so the mold can seal properly again. Otherwise, flash may return as soon as pressure is slightly increased or the material flowability improves.
4. Vents Are Too Deep or Poorly Designed
Vents are necessary in injection molds because they allow air and volatile gases to escape from the cavity. However, if the vents are too deep, too wide, or become larger after long-term wear, molten plastic can enter the vent area and form flash.
This type of flash usually appears near the venting area. It becomes more likely when the material has good flowability, the melt temperature is high, or the injection speed is fast.
Possible solutions include:
- Check whether the vent depth and width are appropriate.
- Check whether the vents have become deeper due to long-term wear.
- Correct vent structures that are too deep or too wide.
- Re-evaluate vent design based on material flowability.
- Properly reduce melt temperature, injection speed, or holding pressure.
Some flash appears only after the material is changed. This does not always mean the mold suddenly failed. It may simply mean the new material flows better, and the original vent depth is now too deep for the current resin.
5. High Material Flowability or Excessive Melt Temperature
The material itself can also affect flash. Some plastics have very good flowability and can easily enter small gaps. If the melt temperature is set too high, the material viscosity decreases further, making thin flash more likely.
This situation often happens after changing the material, switching to another material grade, or increasing the melt temperature to improve filling. A gap that did not cause flash before may start to leak under higher-flow conditions.
Possible solutions include:
- Check whether the material flowability is suitable for the current mold.
- Properly reduce the melt temperature.
- Avoid blindly increasing melt temperature just to improve filling.
- Re-evaluate vents, parting surfaces, and shut-off gaps.
- Adjust the gate, venting, or local shut-off structure when necessary.
Good material flowability is not a problem by itself, but it can amplify existing mold gaps, excessive vent depth, and weak shut-off areas. So when flash appears after changing materials, do not look only at process settings. The mold structure must also be checked to see whether it suits the new material.
Conclusion
Common causes of injection molding flash include insufficient clamping force, excessive process pressure or speed, mold wear, overly deep vents, and high material flowability.
When solving flash, manufacturers should not rely only on reducing pressure. A more reliable approach is to first identify which type of cause is involved, and then decide whether to adjust process parameters, check clamping conditions, repair the mold, or re-evaluate the material and vent design.
For more information about injection molding defects, please visit: Common Injection Molding Defects and Solutions.