After reading our previous comparison of two-shot injection molding and overmolding, you may already have made your choice: if two-shot injection molding is a better fit for your product, what should you consider next?
Can the two materials bond reliably? How should the materials be paired? Which design details are most likely to cause problems? And what types of applications are best suited to two-shot injection molding?
This article focuses on these practical questions and covers the main benefits, material selection, design guidelines, and typical applications of two-shot injection molding.
1. Main Benefits of Two-Shot Injection Molding
Molding Two Materials or Two Colors in One Process
One of the biggest advantages of two-shot injection molding is that it can combine two materials or two colors within a single molding process.
The two materials may be rigid plastics in different colors, or a rigid plastic combined with a soft material such as TPE or TPU.
Reduced Assembly and Labor Costs
With traditional manufacturing methods, a product made from two materials often requires two separate parts to be produced first and then joined by snap fits, adhesive bonding, welding, or manual assembly.
Two-shot injection molding can form the two sections as one integrated part, reducing both the number of components and the need for secondary assembly operations.
For stable, high-volume production, this can reduce labor costs while also minimizing assembly errors and improving product consistency.
More Reliable Material Bonding
In two-shot injection molding, the second material is typically injected directly onto the surface of the first-shot substrate.
If the two materials are compatible and the molding temperature, bonding interface, and part design are properly controlled, a strong and stable bond can be achieved between them.
Improved Product Function and Feel
Two-shot injection molding is not only about creating two colors. More importantly, it allows different material properties to be integrated into a single part.
For example, a rigid plastic can provide structural strength, while a soft material can add grip, vibration damping, cushioning, sealing, or a softer touch.
Improved Product Appearance
Two-shot injection molding can directly create clean color separation, logos, decorative areas, transparent windows, or surfaces with different material finishes.
Compared with painting, screen printing, or other secondary decoration processes, the colors and features are formed directly from the materials themselves. This generally provides better durability while reducing post-processing steps.
Better Suited for Stable High-Volume Production
Two-shot injection molding combines multiple manufacturing and assembly steps into one molding cycle, making it highly efficient for stable, high-volume production.
2. Material Selection for Two-Shot Injection Molding
Not every pair of plastics can be used together in two-shot injection molding.
If the materials are not selected properly, the part may still be moldable, but problems such as weak bonding, deformation, cracking, or delamination can occur. When selecting a material combination, the following factors should be considered carefully.
1) Material Compatibility
Different plastics have different chemical properties, and their compatibility directly affects the bonding strength and overall bonding performance in two-shot injection molding.
For this reason, one of the most important steps in product design is choosing the right substrate material and overmold material. The compatibility of common plastics is shown in the figure below:
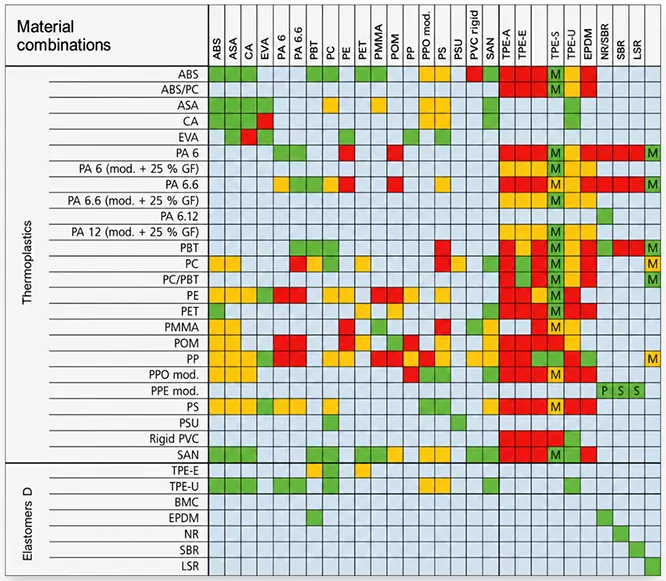
The chart above should only be used as a general selection guide. When choosing specific material grades, it is best to consult the material supplier for more professional recommendations.
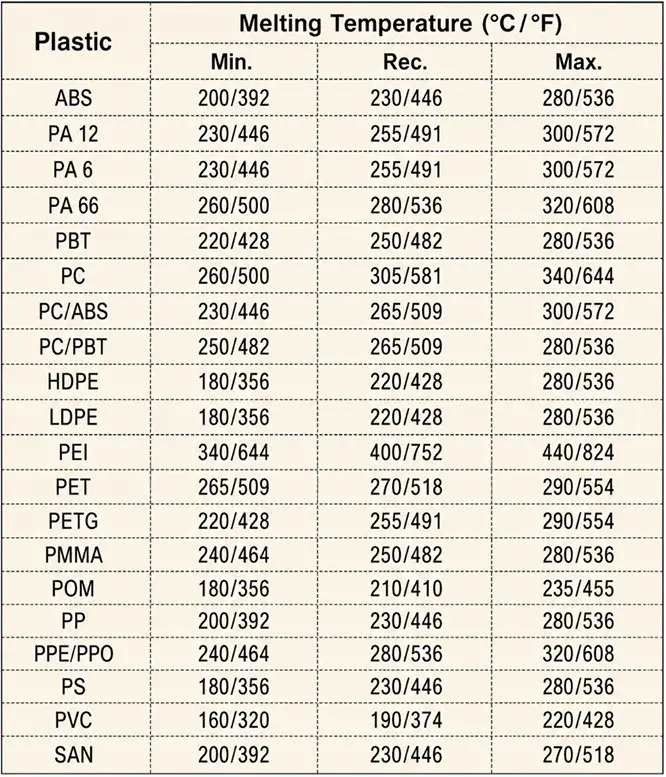
2) Melting Temperature and Processing Temperature
If the injection temperature of the second material is too high, the first-shot substrate may soften again or even deform. If the temperature is too low, however, the bond at the material interface may be weakened.
As a general guideline, the difference in melting temperature between the substrate material and the second-shot material should be kept within approximately 30–60°C. Typical melting temperatures of common plastics are shown in the figure below:
3) Differences in Shrinkage
Different plastics have different shrinkage rates during cooling.
If the shrinkage difference between the two materials is too large, internal stresses may develop after cooling, which can lead to warpage, dimensional deviation, interface cracking, or delamination.
This is particularly important when the bonded area between the two materials is relatively large.
3. Design Guide for Two-Shot Injection Molded Parts
Two-shot injection molded parts should follow the design guidelines below:
1) Internal Bonding Interface Design
The bonding strength between the substrate and the second-shot material depends on several factors, including material compatibility, processing temperature, bonding interface design, molding sequence, and the use of mechanical interlocking features at the internal interface.
First, the bonding area should be increased as much as possible to improve the overall bond strength between the two materials.
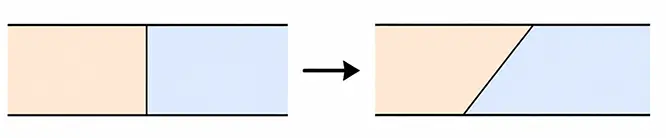
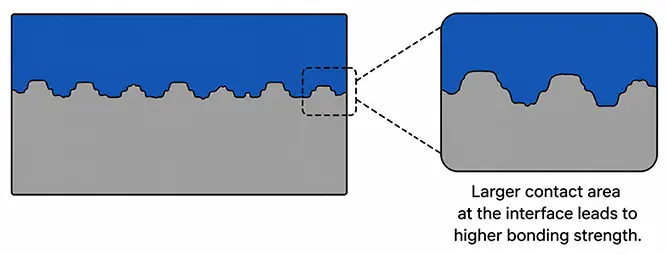
If the internal bonding area is too small, texturing can be added to the interface to increase surface roughness, thereby increasing the effective contact area and improving bonding performance.
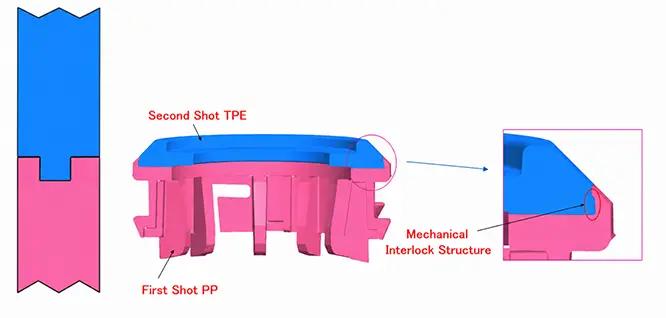
Mechanical interlocking features can also be added to the part. Holes, grooves, undercuts, or similar structures allow the second material to physically lock onto the first-shot substrate after molding.
2) Design of the Visible Interface
The visible interface between the first shot and the second shot can be challenging to design.
Sufficient bonding strength must be provided; otherwise, defects such as flash, burrs, edge rolling, or peeling can easily occur. This is especially important in two-shot molding applications that combine rigid and soft plastics.
Two common interface designs are stepped joints and grooved joints:
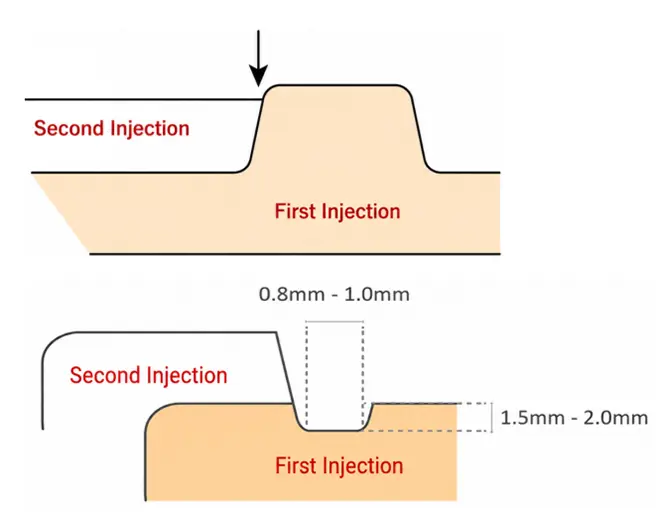
In the figure, 0.8–1.0 mm indicates the width of the groove into which the second-shot material enters the first-shot substrate, while 1.5–2.0 mm indicates the supporting thickness reserved in the first-shot substrate for that groove.
3) Keep Wall Thickness Uniform and Avoid Sharp Corners
Two-shot injection molding is still a form of injection molding, so standard injection molding DFM guidelines also apply.
This includes maintaining uniform wall thickness, avoiding sharp corners, and using smooth transitions wherever possible.

4) Consider Draft Angles
Draft angles determine which side of the mold the part remains attached to during rotation.
After the first shot, the part should stay on the moving mold half, which requires sufficient draft.
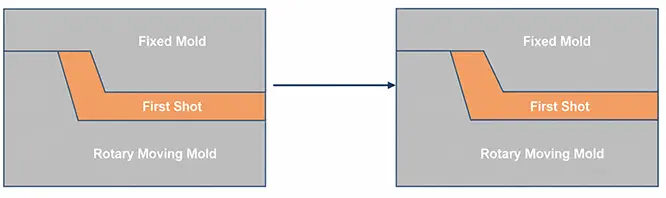
A larger draft angle reduces the release resistance between the part and the fixed mold half, helping ensure that the first-shot part remains on the rotating moving half and can move smoothly into position for the second injection.
Need a Two-Shot Injection Molding Design Review?
If you are developing a two-shot injection molded product, or if you are unsure whether the material combination, bonding interface, or demolding method is appropriate, feel free to contact us.
We can provide DFM analysis and design recommendations before tooling begins, helping you identify potential issues early and determine a more suitable two-shot injection molding solution.
4. Typical Applications of Two-Shot Injection Molding
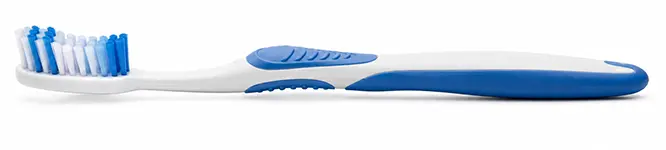
1) Rigid-Soft Combinations and Non-Slip Grips
These products typically use a rigid plastic as the structural body, with TPE, TPU, or another soft material molded onto gripping or contact areas.
The rigid material provides strength, while the soft material improves grip, comfort, and ergonomics.
Typical example: toothbrush handle
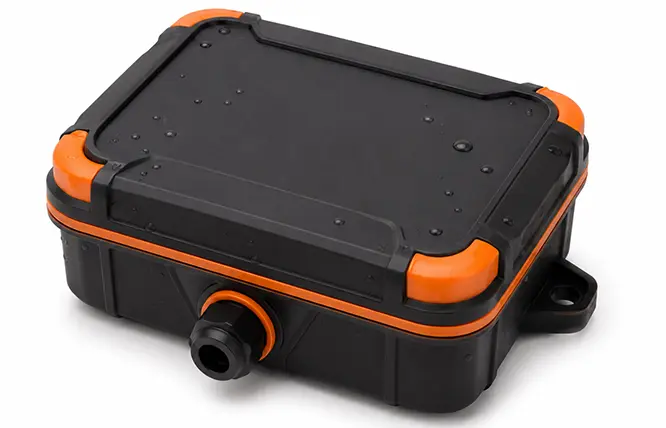
2) Sealing, Waterproofing, and Cushioning Structures
Flexible materials can be molded directly onto rigid parts to create sealing, cushioning, or vibration-damping features.
This can reduce the need to manufacture and install separate seals, gaskets, or cushioning components.
Typical example: waterproof electronic enclosure
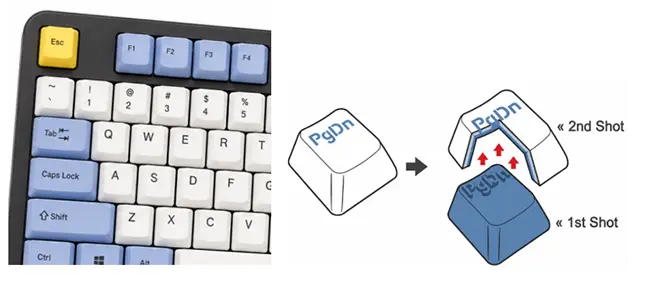
3) Multi-Color Appearance and Functional Differentiation
Two-shot injection molding can also combine two rigid plastics in different colors.
This makes it possible to create stable, clearly defined color zones without additional painting or printing.
Typical example: colored buttons
4) Integrated Transparent Windows and Opaque Housings
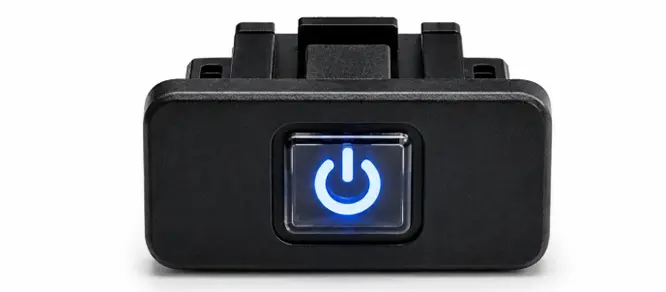
Transparent and opaque plastics can be combined into a single part through two-shot injection molding.
For example, transparent PC can be used for a viewing area or indicator-light window, while an opaque material forms the main body of the part.
Typical example: indicator-light window
5) Buttons and Flexible Operating Areas
Two-shot injection molding is also well suited to products that require both rigid support and localized flexibility.
The rigid material forms the main structure, while the flexible material creates pressable or deformable operating areas.
Typical example: remote-control buttons

Conclusion
For two-shot injection molding, many potential problems should be addressed long before the mold is built.
Whether the materials can bond properly, how the two injection stages work together, and whether the part remains on the correct side of the mold are all directly related to product design.
The earlier material selection, part structure, and molding method are considered together, the smoother the later development process is likely to be.