Rapid prototyping is a quick assembly of a physical part, assembly, or model using 3D computer-aided designs. The main advantage of prototypes is their function as a stepping stone to full production.
Using a rapid prototype removes the need for hand tools and is quick and economical. Many clients prefer that the physical parts are manufactured hastily to meet their marketing deadlines or show their design for acceptance.
We allow you to test out your design first using the prototype tool when you decide to work with us.
Benefits of Using The Prototype Tool
Design feedback
Once you send us your design, our engineers take a look at it. The quote will depend on the method and quantity. However, if your design has any problem, our engineers will advise you on the right way.
Iterative development
We will send you a prototype physical to check for any mistakes before the product is manufactured in large numbers. After that, we’ll mass-produce the product once you are satisfied with the iterate designs. Your market time will be reduced through the development of iterate cycles.
Verification of design
We first test the fit and shape with a few numbers of the molded parts.
Carry out functional tests using prototypes made of production-grade material.
Finish up with an online design.
What Are The Types of Rapid Prototypes
-
Stereolithography (SL)
Stereolithography is a 3D printing technique utilizing a computer programmed laser pre-programmed by software such as CAD/ CAM.
SL is among the most popular methods in additive manufacturing. It is used to create rapid cosmetic prototypes, complex parts, and concept models with complex geometry within 24 hours. Pieces made through SL are of quality surface finish with extremely high feature resolution.
Apart from the above, we also offer complementary secondary services such as measurement, inspection, post-machining, and painting, making your 3D printed project even more attractive.
We also have guidelines for Stereolithography to assist you in understanding limitations and capabilities.
How Does It Work
Manufacturing the parts begins with the SL forming the outline for support, then the part. An ultraviolet ray is then aimed at the surface of a thermoset resin in a liquid state.
The next layer of resin coat is applied after the surface has an outline of the image. To reach the end product, you have to repeat the process over and over again.
Once the process is completed, we place the product in lab solvents to eliminate any excess resins.
After cleaning the parts, we manually take them out from the solvent. It is put under UV lights to harden the surface.
The last step is to apply a custom filler for finishing. Parts or products created from SL degrade quickly; thus, they should not be used in the slightest humidity and UV.
Why should you use SL to print your 3D project
Stereolithography builds project designs and rapid prototypes requiring parts with precise and accurately detailed parts. It is best for creating pieces used for proving concepts and testing ergonomically.
We have datasheet materials for Stereolithography for guidance.
-
Selective Laser Sintering 3D Printing
Selective Laser Sintering is a printing technique that uses 3D additive manufacturing technology to sinter minute polymer powder particles.
Engineers love using SLS 3D printing for manufacturing parts. The advantages of using SLS 3D printing are high productivity, established materials, and low production per part.
Initially, SLS printing was only accessible to a few companies, but the advances in software, machinery, and materials have made it accessible to many other businesses.
How Does SLS 3D Printing Works
Printing
The powder is scattered in a light layer on top of a platform inside of the build chamber. The printer then heats the powder to a temperature below the melting point of the materials.
Thus it becomes easier to raise the temperature of other parts of the powder bed. The particles fuse to form a single solid piece.
Cooling
The build chamber needs to cool a bit after printing, including the machine’s exterior, to prevent the warping of parts.
Post-processing
Once the process is complete, you must remove the finished part and clean out the excess powder.
The pieces are further processed by media tumbling or blasting while the excess powder is recycled.
There is a similarity between parts manufactured using SLS 3D printing and injection molding.
Types of 3D Printers
Printers using SLS have the same functions, but differentiators come under the capacity of building area, the system’s complexity, and the type of laser.
Another difference lies in the type of powder, layer disposition, and temperature control. When using SLS, it is important to maintain a high level of precision and control all through printing.
-
Fused Deposition Modeling (FDM) or Material Jetting
Fused deposition modeling is a cheap and straightforward additive manufacturing technique, thus its popularity.
The raw materials used in the method are polymers. First, the polymer is heated to molten and then forced out throw the machine nozzle. There are three degrees of freedom the nozzle can turn.
Molten is then deposited on a built-in layer in the patterns till the desired shape and size are achieved. The nozzle moves back and forth systematically during the layering of molten.
The features of the thermoplastic will determine the resolution and effectiveness of the part manufactured.
You can get rid of the layered material by soaking the layering plate in detergent, which highly depends on the type of polymer used.
Printed components must be cleaned on the surface through sanding, painting, or milling, enhancing their functionality.
-
Selective Laser Melting (SLM) or Powder Bed Fusion
Most engineers use SLM when the part manufactured should come out intense and complex. SLM is a metal additive manufacturing technique and is used for mass production and rapid prototyping.
How does it work
The process takes place under a metal power bed umbrella. First, the laser melts the powder material in layers till the whole model finishes up.
After the powder melts together, the product is a homogenous part. The typical printing materials used are pure raw materials such as titanium. However, impure metal can be used, such as alloy.
-
Laminated Object Manufacturing (Sheet Lamination)
It is an AM method whereby cross-section is cut into a thin material and attached to the previous layer using glue. Materials used in the process are paper, foil, or plastic.
New material goes on after the engineer lowers the building layer. The layers attach with heat-activated glue and a hot lamination roller.
The third step is passing the newly formed layer on top of another belt of layers. The cross-sect cuts using a laser cutter and removes the excess material.
Advances in some machines allow for color modification and mixing when printing.
-
Digital Light Processing
Digital light processing has processes similar to SLA, where it takes to order from 3D modeling software. The digital light processing method is used to print a 3D object.
How it works
The model is sent to the printer. The DLP projects light on the liquid polymer under safelight conditions.
Once the liquid polymer exposed to light hardens, the building plate moves down, making the complex polymer exposed to more light. The above process repeats until the vat is drained of the liquid.
-
Binder Jetting
It is a technique that allows one or more parts to be printed once but weaker than the ones built through SLS. The method uses two materials a binder and powder-based materials. The two powder layers adhere together due to the binder.
The layers compress using a roller before they are taken to the next powder layer is applied- then the process begins again.
After the process is finished, the parts are let out to cure in an oven burning off the fuse and binder into smaller essential pieces.
Importance of Rapid Prototypes
We live in a fast-paced world, and the only way to keep up with the competition is to develop and market faster than other companies.
It is for this reason that rapid prototype fabrication has become a necessity in manufacturing. When you incorporate rapid prototypes in production, you can achieve the following goals.
The end product of rapid prototypes gives the client, end-user, and customer an easier way to get feedback.
The manufacturers can test the functionality of the parts through objectives and final specifications.
The early stage of RP is the design acceptance form and function of the design.
Products are rapidly manufactured. Prototyping is an essential process in the creation of successful products since it hastens the development of new products.
Applications
At RJC, we use rapid prototyping to build representative prototypes. It assists in imagination, designing development of the process before even manufacturing begins.
Initially, rapid prototyping was used to make parts and scale for the automotive industry. However, the technique has been adopted after technological advances in various industries, including aerospace and medical.
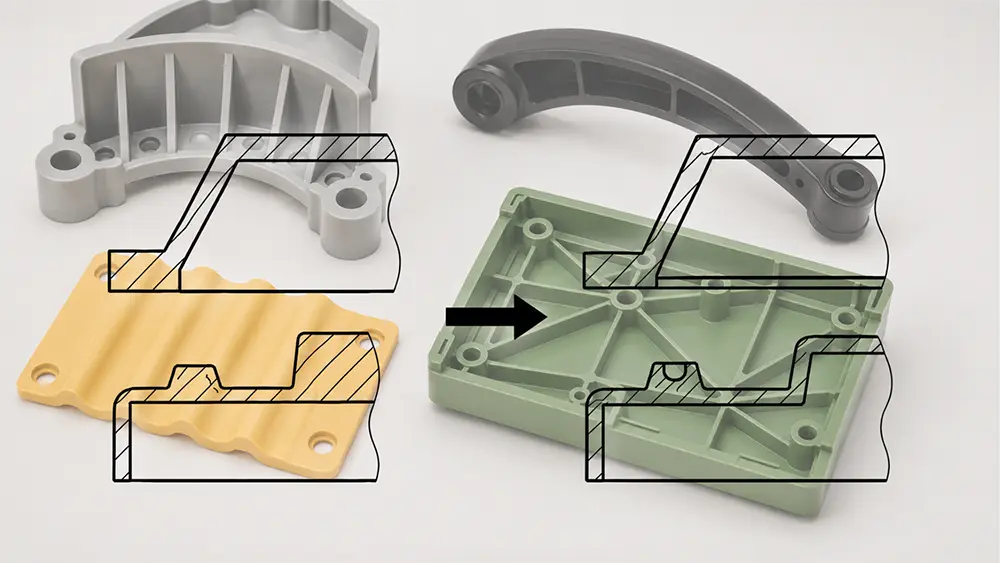
Another application of rapid prototyping is rapid tooling. In rapid tooling processes, such as injecting molded cavities are used in the production of other products.